Sale on canvas prints! Use code ABCXYZ at checkout for a special discount!

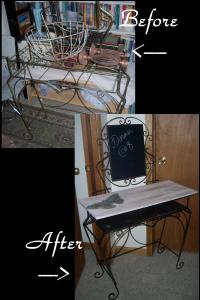
I came across a forlorn (very forlorn) vintage metal vanity table at a community garage sale near my home. I liked the lines of it. The finish had worn off, the mirror broken and missing, the coated masonite top and shelf were scratched and frayed. The lady selling it told me it was hers when she was young and nearly cried when I said I wanted it. I promised her I'd love it up and do it proud. When I bought it my husband just rolled his eyes and thought I lost my mind.
I removed the top and shelf from the frame, then spray painted the frame flat black. While the photo does not adequately show it, when the black was dry, I over sprayed it with textured rust spray paint. I was careful not to put too much of the faux rust on it, just enough to make it beautiful.
Using pallet strips, I constructed the table top to fit, using a piece of quarter inch ply on the bottom cut to fit the opening for the top in the frame. I chose to overhang the top by about two inches on front and sides. The top received a coat of ivory chalk paint. I was careful to leave a few spots of bare wood peeking (I do mean peeking) through. I did not want the inner shelf white as well as it would overpower the thin metal frame. I "primed" it with a thin coat of ivory chalk paint. When dry used charcoal chalk paint over it. While still wet, I wiped some of the charcoal off in a few spots to imitate wear.
Next came the fun part. I found a vintage butterfly graphic and printed it onto freezer paper. Pulling it off the printer I placed it face down EXACTLY where I wanted it on the table. There's no readjusting, so plan well before hand. I taped it down using painters tape, then used the back of a soup spoon and burnished it carefully onto the table top. Make sure you get every little spot. If you're careful you can gently lift one corner to peek for confirmation. When you're satisfied, gently and carefully lift off the paper and let dry completely. You can touch up any areas you are unhappy with using thinned acrylic paint.
Next I made a walnut brown glaze and brushed on intermittent strokes to simulate wear, doing the same to the shelf as well. Don't forget the edges if they will show on yours, like they do on my table top.
Next I chalk board painted a piece of quarter inch hardboard (masonite) and cut it to size, and wired it into the mirror frame.
When the top and shelf were dry, I waxed them with dark wax to help age them a little more, while keeping them protected. Using u-shaped clamps about the size of the metal on the frame, I secured the top and shelf to the frame.
It's on it's way to my Redeaux booth and I'm hoping someone has the perfect place for it.